

How To Remove Film Grain In Photoshop

Reducing Dissonance In Images With Photoshop
In this Photograph Retouch tutorial, we'll await at how to reduce the appearance of noise in an image, including luminance noise, color noise and fifty-fifty jpeg artifacts, all using the Reduce Noise filter, beginning introduced in Photoshop CS2 (which means you'll need at least CS2 to follow along).
Notice that the name of the filter is Reduce Noise, non Remove Racket. As powerful as Photoshop is, there'southward still no way to take a noisy image and clean information technology up completely, at to the lowest degree not without removing most of the item in the paradigm along with it.
Any time we shoot in low light, utilize high ISO settings, or leave the expensive dSLR at home considering the compact camera is easier to deport, there'southward a skillful chance we'll be dealing with noise. Fortunately, while we tin can't remove information technology completely, Photoshop's Reduce Racket filter still does a skillful job of reducing noise without sacrificing important epitome detail. Let's run into how it works.
Here's an paradigm I take open on my screen, taken a couple of years ago while walking through Creature Kingdom in Disney World. I haven't done anything with the epitome yet other than cropped it a piddling:
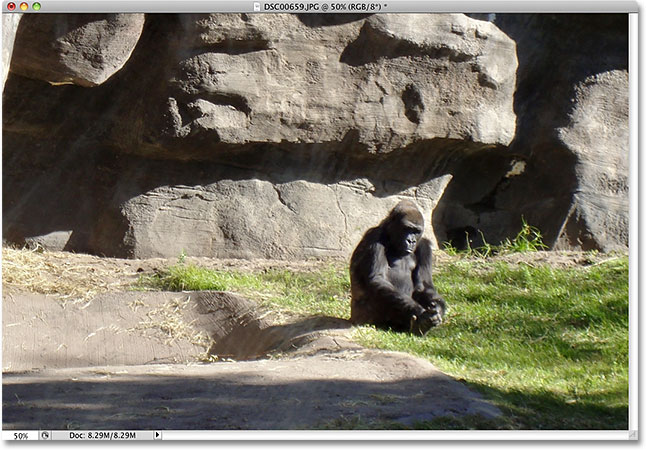
She may look bored, only you wouldn't similar her when she's angry.
As I mentioned, in that location's three types of dissonance that the Reduce Noise filter tin can tackle. One of them is colour noise, normally fabricated up of carmine, green and blue dots. This image was taken with an cheap point-and-shoot camera, a prime number candidate for noise, and if I zoom in on the gorilla, we see lots of red, green and blue "splotches" in her fur, especially along the edges between the dark shadow areas and the lighter areas:

Red, green and bluish color noise is visible when we zoom in.
Let'southward come across what the Reduce Dissonance filter can do for us. To open up the Reduce Noise filter, get up to the Filter menu, choose Dissonance, and and so choose Reduce Racket:

Become to Filter > Racket > Reduce Noise.
The Dialog Box
The Reduce Racket dialog box contains a large preview area on the left and then nosotros tin can run across what we're doing (although we tin also see what we're doing in the document window itself as long as the Preview option is checked, which it is past default) and some sliders and options along the right. Even though it'south not so obvious, the cavalcade along the correct is actually divided upward into different sections, with each section affecting a dissimilar type of dissonance. I've colorized the sections we're most interested in.
From top to bottom, the first 2 sliders, Strength and Preserve Details (colored in light-green), are used to remove luminance noise, which we'll expect at soon. Side by side is the Reduce Colour Racket slider (xanthous), which, every bit you lot may accept guessed, reduces color noise. Below that is a slider we're not going to await at, Sharpen Details (non colored), since it has null to do with reducing noise. Sharpening images, which is what this slider does, is better handled with one of Photoshop's actual sharpening filters, like Unsharp Mask or Smart Sharpen, then I'd recommend lowering the Sharpen Details selection downwards to 0%, finer turning it off. Finally, we have the Remove JPEG Artifact selection (blueish) for reducing the appearance of jpeg pinch artifacts:

The Reduce Racket filter dialog box. Different sliders and options reduce different types of racket.
To get the most out of the Reduce Noise filter, it's all-time to begin by turning the filter off and so information technology has no outcome on the image. At that place'south no bodily "Off" push, only nosotros tin can accomplish the same matter by dragging all of the sliders to the far left, which sets each choice to 0. Too, make sure the Remove JPEG Artifact pick is unchecked.
Navigating The Preview Area
To zoom in and out of the image within the preview area, click on the Plus ( + ) and Minus ( - ) icons along the bottom. The current zoom level appears between them. Click and drag within the preview expanse to motion the image around as needed:

Use the + and - icons to zoom in and out of the image. Click and drag to motion the epitome around within the preview area.
Color Noise
The first type of noise yous'll want to bank check for and reduce is color racket, those red, dark-green and blue dots like the ones nosotros're seeing in my image. Use the preview window in the dialog box to zoom in on an area that contains color racket. Start with the Reduce Color Noise pick ready to 0%, then slowly drag the slider towards the right until the color racket has composite in with the image as much as possible. Go on an center on the preview area as you drag the slider to judge the results and so you don't end up dragging too far:

Drag the Reduce Colour Noise slider towards the right until the color noise disappears.
To apace get a "earlier and afterwards" view of the image then you tin see how much of an improvement yous've made, click and hold inside the preview area. This shows y'all what the original version looked like. Release your mouse button to run into the furnishings of the Reduce Noise filter.
In my instance, the colour dissonance seems to disappear nicely with a Reduce Color Dissonance value of effectually 60%. We tin see in the preview window that the red, dark-green and blueish dots accept been removed. The value you end up using will depend entirely on your prototype, then it'due south of import to sentry the preview area equally you drag the sliders:

Dragging a single slider towards the right was all it took to remove the color noise from the epitome.
Luminance Noise
Once y'all've taken intendance of any color noise, it's fourth dimension to reduce luminance racket. Unlike color noise which is made up of unlike colored dots, luminance dissonance contains dots of varying effulgence levels (black, white, and grey). I'm going to switch to a different image, one where the luminance racket is easier to see. Normally, of class, you'd nevertheless be working on the same epitome. Here's a photo shot in a dimly-lit museum at ISO 2000 with my Canon 5D Mark Two:

Noise in an image tin can be hard to meet when you're zoomed out as well far.
Even though the photographic camera does an amazing chore of keeping noise to a minimum at such high ISO settings, if I zoom in on the image inside the Reduce Noise dialog box, we yet see quite a lot of luminance noise:

All those blackness, white and gray speckles are luminance noise.
Removing luminance noise is a simple two-step process, only remember, nosotros need to accept realistic expectations. In my case here, at that place's no style I'll be able to brand an paradigm shot at ISO 2000 await just every bit make clean and smooth as if I had shot information technology at ISO 100 or 200. All we can exercise is try to make the image wait ameliorate than it did originally.
Outset, beginning with the Strength value set to 0%, and then slowly elevate the slider towards the right while keeping an eye on the prototype in the preview area until as much of the luminance racket as possible is removed. Click and hold inside the preview area to encounter what the prototype looked like originally, and so release your mouse button to see how much noise reduction has been applied. In one case y'all've removed all the noise you tin, brainstorm dragging the Preserve Details slider towards the right to bring back as much paradigm detail as possible without re-introducing the dissonance. It'southward a fine balancing act between removing noise and maintaining detail, and the values you end up using for Strength and Preserve Details volition be unlike for every paradigm:

Remove as much noise as possible with the Strength slider, so bring back detail with Preserve Details.
Advanced Options
If you can't seem to reduce the dissonance without losing lots of image item, try the Advanced Options, which allow united states of america to reduce dissonance on a channel-by-channel ground. Beginning, set the Strength slider dorsum to 0, then select Avant-garde in the elevation right of the dialog box. With Advanced selected, click on the Per Channel tab:

Select the Advanced choice, and then click on the Per Channel tab.
Most images are fabricated up of three colour channels - Ruby, Green and Blue - and it's very mutual for 1 of these channels to contain more racket than the others, with the Blue channel oft being the biggest offender. By reducing noise on a channel-by-channel basis, we tin can apply the strongest amount of noise reduction to the channel that needs it the most, leaving more image detail in the cleaner channels.
Bike through the channels using the Aqueduct pick directly below the smaller, blackness and white preview area. Click and drag inside the preview expanse to motility the image effectually as you inspect the aqueduct for noise. Below the Aqueduct choice are the same Strength and Preserve Details sliders we saw earlier, but this time, they affect only the selected aqueduct. Merely as we did a moment ago, start with both sliders fix to 0, and so begin dragging the Strength slider towards the right to remove equally much noise as possible in the channel. Click and hold within the black and white preview expanse to view how the channel looked originally, then release your mouse push button to view it with the noise reduction applied. In one case you've removed equally much racket every bit possible, begin dragging the Preserve Details slider towards the correct to bring dorsum some image detail without bringing back besides much noise. Here, I'm reducing racket in the Blue channel, which in my instance is the noisiest channel of the three:

Switch between the 3 color channels, then employ dissimilar amounts of noise reduction to each channel.
One time you've done all you tin can in each channel, switch back over to the principal controls by clicking the Overall tab to the left of the Per Aqueduct tab, then try again with the main Strength and Preserve Details sliders to see if you lot tin fine-tune the results even more:

When you're washed with the individual channels, fine-tune things with the Overall sliders.
JPEG Artifacts
Finally, whenever yous're working with jpeg images, whether you're shooting jpegs with your digital camera or the image was saved equally a jpeg in Photoshop or some other plan, you'll encounter jpeg compression artifacts, which make the image await like it's been divided into a blueprint of 8x8 pixel squares. Just how visible these artifacts will announced depends on how much compression was used, every bit well as how many times the image was saved as a jpeg. Each time you re-save a jpeg image every bit a jpeg prototype, the quality becomes worse.
To reduce the appearance of the compression artifacts, select the Remove JPEG Artifact option:

Select the Remove JPEG Artifact option to reduce the appearance of jpeg compression.
Make sure you audit the paradigm when this option is selected, since it could result in a loss of too much particular. Every bit with luminance and color racket, it's ever a trade-off between reducing racket and keeping as much prototype detail equally possible. When you're done, click OK in the top right corner of the dialog box to utilize all of the settings and leave out of the Reduce Noise filter.
And there we have it! Cheque out our Photo Retouching section for more than Photoshop prototype editing tutorials!
Other Stuff
© 2022 Photoshop Essentials.com.
For inspiration, not duplication.
Site design by Steve Patterson.
Photoshop is a trademark of Adobe Systems Inc.

How To Remove Film Grain In Photoshop,
Source: https://www.photoshopessentials.com/photo-editing/reduce-noise/
Posted by: juarezfinstiout.blogspot.com
0 Response to "How To Remove Film Grain In Photoshop"
Post a Comment